|
Key Takeaways
|
|
Rally’s Capacity Planning tools model plans for portfolio items of all types, and on many time horizons. One common use for Capacity Planning is for Quarterly or Planning Interval (PI) Big Room Planning (BRP) events. Modeling the capacity of teams against demand for feature work helps us make good decisions and avoid “wishful thinking” about delivery commitments.
In this post, we’ll offer an example of how Capacity Planning works. In this example, we’re getting ready for the Release/PI “2023 R3.” We’ll prepare a draft capacity plan to bring into our BRP event so teams can have visibility across all of their work. With this visibility, teams will be able to validate what they will be working on, have necessary tradeoff conversations for any issues that they discover, and help finalize the plan.
Understanding the tools
Capacity Planning in Rally lets us create multiple plans per PI for the same teams and trains so we can evaluate the outcomes of more than one draft plan. A user with the “Planner” permission can see and work with all plans (published and unpublished) for their teams and trains. The screen shot below offers an example of this view.
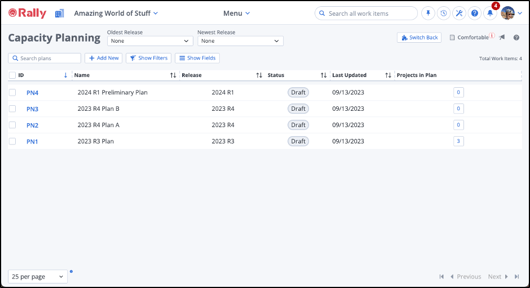
Each capacity plan is made up of the teams participating in the train for the upcoming PI and the Features (or other Portfolio Items) being allocated to each team. Let’s look at the plan for “2023 R3.”
Developing the plan
In this case, we have the three teams (Red, Blue, and Green) on our train participating in the upcoming PI. We’ll need to make some preliminary decisions and estimates for the plan:
Estimating team capacity
We want to make educated, fact-based estimates of capacity (future velocity) for each of the teams. A great place to start is the Velocity Chart for each team. For example, the Red Team has an average recent velocity of 41 points per iteration. If we have four iterations in the PI, then we can estimate their capacity at 164 points and enter that in the Points Capacity field for the project. Note that we can enter any value here, which lets us hypothesize about a potential increase or decrease in capacity and then test those hypotheses.
Estimating sizes
In order to accurately predict the effort needed to deliver a feature, it’s useful to look at what it took to deliver a similar feature in the past. That makes a good foundation for the point values tied to the Preliminary Estimate field. These values are usually expressed in t-shirt sizes.
A Refined Estimate can be entered any time during planning, commonly after creating and estimating User Stories. Capacity Planning uses the Refined Estimate if present. If the Refined Estimate has not been entered, it uses the Preliminary Estimate. If neither is available, we’ll see a warning icon indicating that no estimate has been entered.
The Points Rollup shows the total of all of the Plan Estimate values for any User Stories already rolling up to the item. Note that when we’ve decomposed features into stories, it’s a good practice to transcribe the Points Rollup to the Refined Estimate field. However, this is strictly optional and doesn’t happen automatically.
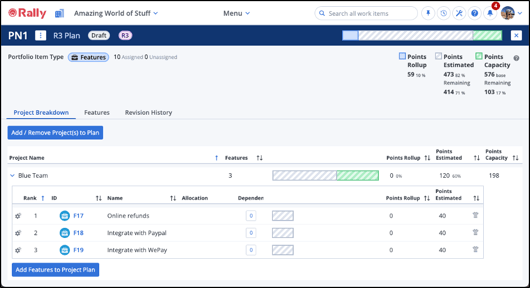
Assigning work to teams
After we have developed a prioritized list of features with size estimates and have an estimate of our teams’ capacity, we’ll match the highest priority features to the teams with the capability and capacity to work on them. We do this by adding features to the Capacity Plan via the Add Features button. If a Feature needs work from more than one team, we can use the Allocate command (which appears on the gear menu for a Feature). Through this command, we can distribute the Points Estimated across the teams we want to work on the Feature. Note that it’s a good practice to reserve some of a team’s capacity for unplanned events (usually about 20% or so) and not to load them to 100% in the plan.
Reviewing the plan
Until a plan is published, it’s only visible to users with the Planner permission. Note that Planners commonly include roles like Product Manager, System or Solution Architect, Release Train Engineer, and others who will collaborate on the draft plan. When it’s time to share those plans with the teams for BRP, then we can publish the plan, making it visible to everyone on the teams.
Publishing the plan
When we’re ready to share the plan with all the teams and stakeholders, we’ll publish the plan. When we publish, we have the option to update certain key fields in the planned Features:
- The Release can be set to the Release (PI) specified in the plan if the plan is for the lowest level Portfolio Item and doesn’t span Releases.
- Planned Start Date can be set to the first day of the Release timebox.
- Planned End Date can be set to the last day of the Release timebox.
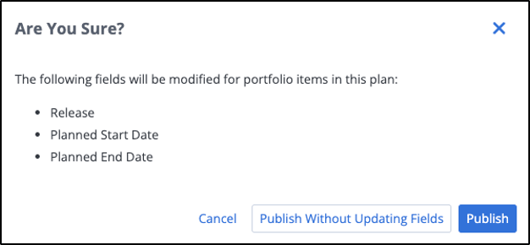
If we’re sharing the plan so that we can refine and validate it at a BRP event, then we might choose the Publish Without Updating Fields button. Then we have the option to either update the relevant fields manually or to edit and re-publish the plan later.
Making the “Plan of Record”
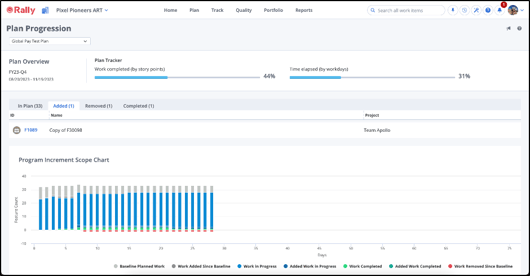
Once your teams and other stakeholders (such as the business have collaborated and arrived at a finalized plan, we can go back to Capacity Planning, edit the plan if needed, and publish it a final time. At this time, we can update the Release and Planned Start and Planned End Date if desired. A published plan serves as the Plan of Record (the approved plan that everyone has agreed to) for the upcoming Release/PI. This plan also serves as a baseline for the Plan Progression page, which provides a view of all Portfolio Items in the plan, along with current progress metrics. This page offers a strong complement to the Release Tracking page and adds scope change to the picture of Release or PI progress.
Now what?
Try creating a Rally Capacity Plan and share it with your teams! Try to do this no less than two to four weeks before your next BRP event. If possible, start even sooner: the earlier you plan, the more informed your teams will be. This will help your teams, the business, and other stakeholders to collaborate in an effective and transparent way, make priorities and capacity clear, and help everyone to make more realistic and predictable value delivery commitments.


Eric Nash
Eric Nash is an Agile expert and Rally resident advisor who is happiest when he can coach and share his passion with others, whether it’s working on digital and Agile transformations, junior golf or fishing. When not on the water he works with organizations in industries from manufacturing to publishing to defense...
Other resources you might be interested in
Controlling Flow Telemetry Overhead in Distributed Environments
See how the latest updates to NetOps Flow reduce telemetry overhead and optimize WAN usage. Simplify data extraction and integration with the OData 4 API.
Clarity: Managing Reports
This course is designed for report consumers who need to access, analyze, and manage published reports in Clarity.
Automic Integration Brochure
This brochure serves as your guide to the diverse tools, platforms, and systems that can connect seamlessly with Automic.
Clarity: Configure Reporting Data Sources Using Data Providers
This course explains the data foundation that supports Reporting in Clarity. Learn how Data Providers prepare, organize, secure, and validate reporting data.
Rally Office Hours: July 9, 2026
This session covers the general availability of milestone delivery confidence, troubleshooting for custom views and admin functions, and upcoming webinars.
Network Observability NCM
See how Network Observability NCM delivers network configuration management capabilities that automate remediation, ensure compliance, and mitigate risk.
Rally Office Hours: July 2, 2026
Explore the July 2, 2026, Rally Office Hours session covering OAuth security updates, the new portfolio item flow states beta, and upcoming event news.
Unleashing Enterprise Agility: The Power of Portfolio Kanban Flow States
Learn how Rally's Customizable Portfolio Item Flow States (PIFS) balance team autonomy with executive visibility to accelerate enterprise value delivery.
Chart Your Team’s Analytics Journey with Customizable Dashboards in DX NetOps
DX NetOps now features customizable dashboards, providing standards-based flexibility and an easy way for new and existing users to add custom dashboards.