|
Key Takeaways
|
|
The UIMAPI is a RESTful API that allows you to perform almost any action in your DX UIM environment programmatically. The Swagger front-end serves as a guide, enabling you to execute REST endpoints manually, but many customers prefer to automate these actions using a program.
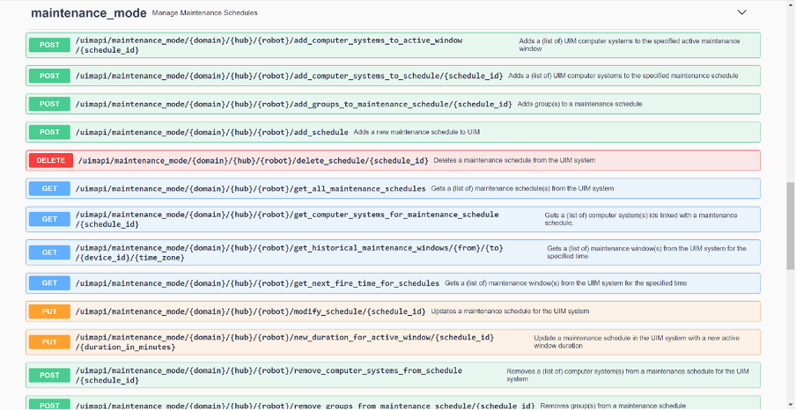
This blog post focuses on using a Java program to interact with the API, and includes examples. However, you can use any programming language that supports a RESTful interface. A RESTful endpoint is essentially a URL that supports a few actions: GET, POST, PUT, and DELETE. For UIMAPI, you will also need credentials. Most GET actions can be performed via a web browser by navigating to the URL. The Swagger documentation for UIMAPI helps you understand the type of each endpoint:
The scenario covered in this blog involves putting a device in maintenance mode for a specified period, which may not cover the entire maintenance window. We will define a maintenance window, and then add and remove the device from maintenance mode.
|
Note: All maintenance mode actions are directed at the maintenance_mode probe running on the primary hub, never to the device. All examples use the base URL to my localhost/UIMAPI endpoints but they will also work with a remote hostname/IP address as well:
All examples are using JSON but the UIMAPI also supports XML. |
Authenticating the UIMAPI
All UIMAPI endpoints require authentication, which is a DX UIM user with Web Service ACL permissions, Base64 encoded as a single string {user}:{password}. This can be done once at the start of your program and the encoded string can be passed to every endpoint call. The bytesEncoded string is sent to each endpoint call made.
The java code example:
// Encode the credentials – define user & pwd variables with your credentialsbytesEncoded = Base64.getEncoder().encodeToString((user+":"+pwd).getBytes());
Using HTTP and HTTPS protocols
A certificate may be required if using the HTTPS protocol. The process of adding a certificate to a keystore is detailed in the DX UIM documentation. Every endpoint call in these examples requires the keystore and the keystore password to establish a secure connection.
If using the HTTP protocol, set the keystore and keystore password values to null.
Define a maintenance window
To put a device in maintenance mode, first create a maintenance window using the add_schedule endpoint. POST the definition of the new schedule in a payload. The add_schedule POST endpoint requires environment values in the URL string, plus the payload:
{base_url}/maintenance_mode/{domin}/{hub}/{robot}/add_schedule/
These values point to the primary hub where the maintenance_mode probe is running. In this example, the URL will be:
{base_url}/maintenance_mode/Validation/Office/primary/add_schedule/
The payload is the actual schedule definition, which must be in the future from when you create it, considering any time zone differences. The payload is:
payload = "{" + " \"name\": \"ExampleBlogWindow\"," + " \"description\": \"Example Schedule for Blog\"," + " \"account_id\": \"-1\"," + " \"start_date_time\": {" + " \"month\": 9," + " \"day\": 5," + " \"year\": 2024," + " \"timestamp\": {" + " \"hours\": 10," + " \"minutes\": 35," + " \"seconds\": 39" + " }" + " }," + " \"end_time\": {" + " \"type\": \"end_date_time\"," + " \"end_date_time\": {" + " \"month\": 9," + " \"day\": 5," + " \"year\": 2024," + " \"timestamp\": {" + " \"hours\": 23," + " \"minutes\": 59," + " \"seconds\": 59" + " }" + " }," + " \"duration\": {" + " \"hours\": 1," + " \"minutes\": 0," + " \"seconds\": 0" + " }" + " }," + " \"recurrence_pattern\": \"daily\"," + " \"recurrence_period\": \"1\"," + " \"recurrence_days_of_the_week\": \"\"," + " \"recurrence_day_of_the_month\": \"0\"," + " \"recurrence_end_date_time\": {" + " \"month\": 0," + " \"day\": 0," + " \"year\": 0," + " \"timestamp\": {" + " \"hours\": 0," + " \"minutes\": 0," + " \"seconds\": 0" + " }" + " }," + " \"recurrence_instance\": \"1\"," + " \"timezone\": \"Europe/London\"" + "}";
Using the URL (updated with your environment) plus the payload, POST the schedule definition (payload) along with the encoded credentials (bytesEncoded).
Here is the Java code example:
// Add a new maintenance scheduleresponseBody = RestCalls.runRestPost(baseUrl, "/maintenance_mode/Validation/Office/primary/add_schedule/", payload, bytesEncoded, keystore, keypwd); System.out.println("Added Schedule: " + responseBody);
This will output the schedule ID:
Added Schedule: { "schedule_id" : "6"}
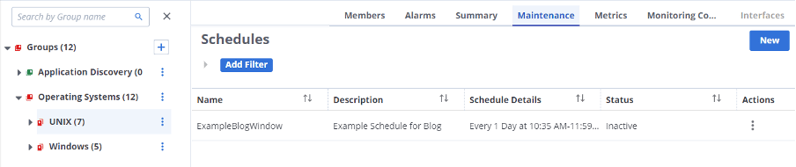
You can view the schedule in the Operator Console by selecting a group and navigating to Maintenance:
Edit Maintenance to view the details:

Add a device to a maintenance window
Adding a device to a maintenance window requires the device and schedule IDs. This involves querying existing data using a GET endpoint. This does not require a payload but still requires the encoded credentials and no changes to the URL. Here are the steps:
- To GET the device ID, you can run the /devices endpoint. All devices are returned, allowing you to loop through and get the required "id" value. If you use MCS on this device, search for it using the /deviceoperations/{identifier} GET endpoint. For example, use “/deviceoperations/centos4?lookup=by_name” to get the value of cs_id.
// Get a list of devicesresponseBody = RestCalls.runRestGet(baseUrl, "/devices", "", bytesEncoded, keystore, keypwd);JSONArray array = new JSONArray(responseBody);System.out.println("Number of devices: " +array.length());name = null;id = 0;// Looking for device centos4 - change this for a device of your ownfor (int i = 0 ; i < array.length() ; i++){name = array.getJSONObject(i).getString("name");id = array.getJSONObject(i).getInt("id");if (name.compareToIgnoreCase("centos4") == 0) {System.out.println("Name: " + name + " - ID: " + id);scheduled_device_id = id;scheduled_device_name = name;break;}}
Output for this environment:Number of devices: 18Name: centos4 - ID: 22 - To GET the schedule id, run the get_all_maintenance_schedules GET endpoint and save the schedule ID in the maintenance_schedule_id variable, which is also used in further examples.
The get_all_maintenance_schedules GET endpoint requires environment values in the URL string itself:{base_url}/maintenance_mode/{domin}/{hub}/{robot}/get_all_maintenance_schedules/
These values point to the primary hub where the maintenance_mode probe is running. In this example, the URL will be:{base_url}/maintenance_mode/Validation/Office/primary/get_all_maintenance_schedules/
Using the URL (updated with your environment), GET the maintenance schedules using the encoded credentials (bytesEncoded):// Get a list of all schedulesresponseBody = RestCalls.runRestGet(baseUrl, "/maintenance_mode/Validation/Office/primary/get_all_maintenance_schedules", "", bytesEncoded, keystore, keypwd);System.out.println("Schedules: " + responseBody);aa = new JSONObject(responseBody);array = aa.getJSONArray("maintenanceSchedules");System.out.println("length: " +array.length());name = null;id = 0;for (int i = 0 ; i < array.length() ; i++){name = array.getJSONObject(i).getString("name");id = array.getJSONObject(i).getInt("id");System.out.println("Name: " + name + " - ID: " + id);if (name.compareToIgnoreCase("ExampleBlogWindow") == 0) {maintenance_schedule_id = id;break;}}
Output for this environment:Schedules: {"maintenanceSchedules" : [ {"id" : 6,"name" : "ExampleBlogWindow","description" : "Example Schedule for Blog","recurrenceDayOfTheMonth" : 5,"recurrencePeriod" : 1,"recurrencePattern" : "Daily","recurrenceEndTime" : "","timeZone" : "Europe/London","duration" : 804,"accountId" : -1,"startTime" : "2024-09-05 10:35:39.747","recurrenceInstance" : 1} ]}length: 1
Add device to the maintenance schedule using the add_computer_systems_to_schedule POST endpoint. The payload is an array of devices; one or many can be specified in the same call. This example only adds the centos4 device identified by the cs_id saved in the scheduled_device_id variable.
The add_computer_systems_to_schedule POST endpoint requires environment values in the URL string itself:
{base_url}/maintenance_mode/{domin}/{hub}/{robot}/add_computer_systems_to_schedule/{schedule id}
These values point to the primary hub in which the maintenance_mode probe is running. Plus, the schedule id value is also required. In this example, the URL will be:
{base_url}/maintenance_mode/Validation/Office/primary/add_computer_systems_to_schedule/6
Using the URL (updated with your environment), POST the device id in the payload plus the encoded credentials (bytesEncoded):
// Add device(s) to the schedule – JSON array comma separated list: { "cs" : [ 16, 3, 9, 11 ] }payload = "{\"cs\":["+ scheduled_device_id + "]}";responseBody = RestCalls.runRestPost(baseUrl, "/maintenance_mode/Validation/Office/primary/add_computer_systems_to_schedule/6", payload, bytesEncoded, keystore, keypwd);
This can be viewed in the schedule:

Viewing the device details will show the maintenance schedules for this device:


List devices in a maintenance window
To list the devices already in the maintenance schedule and confirm the device has been added, use the get_computer_systems_for_maintenance_schedule GET endpoint. No payload is required. Once the list of devices is returned, loop through to find your device using the scheduled_device_id variable.
The add_computer_systems_to_schedule GET endpoint requires environment values in the URL string itself:
{base_url}/maintenance_mode/{domin}/{hub}/{robot}/get_computer_systems_for_maintenance_schedule/{schedule id}
These values point to the primary hub where the maintenance_mode probe is running. Plus, the schedule id value is also required. In this example, the URL will be:
{base_url}/maintenance_mode/Validation/Office/primary/get_computer_systems_for_maintenance_schedule/6
Using the URL (updated with your environment), GET schedule devices using the encoded credentials (bytesEncoded):
responseBody = RestCalls.runRestGet(baseUrl, "/maintenance_mode/Validation/Office/primary/get_computer_systems_for_maintenance_schedule/6", "", bytesEncoded, keystore, keypwd); System.out.println("Devices: " + responseBody); aa = new JSONObject(responseBody);array = aa.getJSONArray("cs");System.out.println("Number of devices in the schedule: " +array.length()); name = null;id = 0;add_device = true;for (int i = 0 ; i < array.length() ; i++){ System.out.println("cs_id: " + array.getInt(i)); if (array.getInt(i) == scheduled_device_id) { System.out.println("Device centos4(" + scheduled_device_id + ") Found in this Maintenance Schedule"); add_device = false; break; }}
Output for this environment:
Number of devices in the schedule: 1cs_id: 22Device centos4(22) Found in this Maintenance Schedule
Remove a device from a maintenance window
To remove device(s) from a maintenance schedule, use the remove_computer_systems_from_schedule POST endpoint. The payload is an array of devices, which is a comma separated list, e.g., { "cs" : [ 16, 3, 9, 11 ] }. One or many can be specified in the same call. This example only removes the centos4 device, which is identified by the cs_id saved in the scheduled_device_id variable.
The remove_computer_systems_to_schedule POST endpoint requires environment values in the URL string itself:
{base_url}/maintenance_mode/{domin}/{hub}/{robot}/remove_computer_systems_from_schedule/{schedule id}
These values point to the primary hub where the maintenance_mode probe is running. Plus, the schedule id value is also required. In this example, the URL will be:
{base_url}/maintenance_mode/Validation/Office/primary/remove_computer_systems_from_schedule/6
Using the URL (updated with your environment), remove the device from the schedule with the payload and encoded credentials (bytesEncoded):
payload = "{\"cs\":["+ scheduled_device_id + "]}";responseBody = RestCalls.runRestPost(baseUrl, "/maintenance_mode/Validation/Office/primary/remove_computer_systems_from_schedule/6", payload, bytesEncoded, keystore, keypwd);
The device is removed from the schedule and no longer in maintenance mode:

Viewing the device details will show there are no maintenance schedules for this device:

Appendix A
Here are all the REST methods used in the examples. These methods are in a class named RestCalls.
runRestPost Method
public static String runRestPost(String baseUri, String path, String payload, String credentials, String keystore, String keypwd) throws ClientProtocolException, IOException { String responseBody = null; CloseableHttpClient client = setupHttpClient(baseUri, keystore, keypwd); logger.log(NimLog.DEBUG, "URL: "+ baseUri+path); HttpPost request = new HttpPost(baseUri+path); request.addHeader(HttpHeaders.AUTHORIZATION,"Basic " + credentials); request.setHeader(HttpHeaders.ACCEPT, "application/json"); request.setHeader(HttpHeaders.CONTENT_TYPE, "application/json"); request.setEntity(new StringEntity(payload, StandardCharsets.UTF_8)); HttpResponse response = client.execute(request); int rc = response.getStatusLine().getStatusCode(); //System.out.println("RC: " + rc + " : response: " +response); if (response.getEntity() != null) { responseBody = EntityUtils.toString(response.getEntity(), StandardCharsets.UTF_8); } if (rc >= 200 && rc < 300) { // do some error checking here return responseBody; } else { logger.log(NimLog.ERROR, "Got response code "+rc+" from method: "+response.getStatusLine().getReasonPhrase()); } return null; }
runRestGet Method
public static String runRestGet(String baseUri, String path, String payload, String credentials, String keystore, String keypwd) throws ClientProtocolException, IOException {String responseBody = null; CloseableHttpClient client = setupHttpClient(baseUri, keystore, keypwd); HttpGet request = new HttpGet(baseUri+path+payload); request.addHeader(HttpHeaders.AUTHORIZATION,"Basic " + credentials); request.setHeader(HttpHeaders.ACCEPT, "application/json"); request.setHeader(HttpHeaders.CONTENT_TYPE, "application/json"); HttpResponse response = client.execute(request); int rc = response.getStatusLine().getStatusCode(); responseBody = EntityUtils.toString(response.getEntity(), StandardCharsets.UTF_8);//System.out.println("Response body: " + responseBody); if (rc >= 200 && rc < 300) { return responseBody; } else { logger.log(NimLog.ERROR, "Got response code "+rc+" from method: "+response.getStatusLine().getReasonPhrase()); } return responseBody;}
setupHttpClient Method
private static CloseableHttpClient setupHttpClient(String baseUri, String keyfile, String keypwd) { CloseableHttpClient httpclient = null; try { if (baseUri.startsWith("https")) { logger.log(NimLog.DEBUG, "setupHttpClient: Setting up https client"); //Creating SSLContextBuilder object SSLContextBuilder SSLBuilder = SSLContexts.custom(); // Loading the Keystore file File file = new File(keyfile); // Update the password for your key file SSLBuilder = SSLBuilder.loadTrustMaterial(file,"#####".toCharArray()); // Building the SSLContext SSLContext sslcontext = SSLBuilder.build(); // Creating SSLConnectionSocketFactory object SSLConnectionSocketFactory sslConSocFactory = new SSLConnectionSocketFactory(sslcontext, new NoopHostnameVerifier()); // Creating HttpClientBuilder HttpClientBuilder clientbuilder = HttpClients.custom(); // Setting the SSLConnectionSocketFactory clientbuilder = clientbuilder.setSSLSocketFactory(sslConSocFactory); // Building the CloseableHttpClient httpclient = clientbuilder.build(); return httpclient;} else { logger.log(NimLog.DEBUG, "setupHttpClient: Setting up http client"); httpclient = HttpClients.custom() .setConnectionTimeToLive(20, TimeUnit.SECONDS) .setMaxConnTotal(400).setMaxConnPerRoute(400) .setDefaultRequestConfig(RequestConfig.custom() .setSocketTimeout(120000).setConnectTimeout(5000).build()) .setRetryHandler(new DefaultHttpRequestRetryHandler(5, true)) .build(); return httpclient;} } catch (KeyManagementException | NoSuchAlgorithmException | KeyStoreException | CertificateException | IOException e) { logger.log(NimLog.ERROR, "setupHttpClient: Exception trying to create the http client: " + e.getLocalizedMessage()); logger.logStackTrace(NimLog.ERROR, e); } return httpclient;}

Steve D'Arcy
Steve D’Arcy is one of Broadcom’s trusted advisors, learning about the challenges customers face and helping overcome them to ensure customers’ business goals are met. He has worked with unified infrastructure management since 2010, and during this time has collaborated closely with engineering and field operations to...
Other resources you might be interested in
This Halloween, the Scariest Monsters Are in Your Network
See how network observability can help you identify and tame the zombies, vampires, and werewolves lurking in your network infrastructure.
Your Root Cause Analysis is Flawed by Design
Discover the critical flaw in your troubleshooting approaches. Employ network observability to extend your visibility across the entire service delivery path.
Whose Fault Is It When the Cloud Fails? Does It Matter?
In today's interconnected environments, it is vital to gain visibility into networks you don't own, including internet and cloud provider infrastructures.
The Future of Network Configuration Management is Unified, Not Uncertain
Read this post and discover how Broadcom is breathing new life into the trusted Voyence NCM, making it a core part of its unified observability platform.
Rally Office Hours: October 9, 2025
Discover Rally's new AI-powered Team Health Widget for flow metrics and drill-downs on feature charts. Plus, get updates on WIP limits and future enhancements.
AAI - Navigating the Interface and Refining Data Views
This course introduces you to AAI’s interface and shows you how to navigate efficiently, work with tables, and refine large datasets using search and filter tools.
Rally Office Hours: October 16, 2025
Rally's new AI-driven feature automates artifact breakdown - transforming features into stories or stories into tasks - saving time and ensuring consistency.
What’s New in Network Observability for Fall 2025
Discover how the Fall 2025 release of Network Observability by Broadcom introduces powerful new capabilities, elevating your insights and automation.
Modernizing Monitoring in a Converged IT-OT Landscape
The energy sector is shifting, driven by rapid grid modernization and the convergence of IT and OT networks. Traditional monitoring tools fall short.